Linux Hosting (cPanel)
Browse a list of Linux Hosting articles and learn to set up your account
WURK (Linux Hosting (cPanel)
FREQUENTLY ASKED QUESTIONS
Discover Linux Hosting with cPanel
Browse a list of Linux Hosting articles and learn to set up your account
Hosting (cPanel) articles
Here’s a round-up of the most-visited articles for Web Hosting (cPanel) with cPanel. Use it as your guide—from the basic steps of setting up your hosting and uploading content, right through more advanced topics like database management and changing PHP settings.
Set up my Web Hosting (cPanel) account
After you purchase a Web Hosting (cPanel) plan, you need to set it up before you can use it to host your website.
Warning: Setting up an account can change a domain's DNS records, so existing websites and email addresses might stop working. For help finding the best path, on our Contact Us
- Go to your Wurk product page.
- Under Web Hosting, next to the Web Hosting (cPanel) account you want to set up, click Set up.

- Complete the on-screen fields, and then click Finish.
- We'll ask you which of your domains you want to associate with the account as your primary domain. You can also specify a subdomain if you like.
- We'll ask if you'd like to install WordPress during setup. If so, you'll set your WordPress username and password at that time.
- If you're setting up your account with an Internationalized Domain Name, you'll need to enter the Punycode version of the domain name.
When setup is complete, your account Dashboard appears. Your primary domain name appears at the top.
Next steps
- Change your cPanel password to something you know: We auto-generated a cPanel login name and password to set up cPanel for your account. We can't show you that password for security reasons. Before you start using the account, it's a good idea to change your cPanel password to something you know
- Learn more about your new Web Hosting (cPanel) account: Take our Guided Tour of the account Dashboard, WordPress, and cPanel.
- Install an SSL certificate: Planning an online store? Then you've got to have a secure website. Here's our path for requesting and installing an SSL certificate
- Set up website backups: Backing up your site is a great way to protect your content and data if there's a real problem. You can set up backups yourself in cPanel, or let us handle that for you with our Website Backup service.
- Start building your site with WordPress: Check out our list of the basics you need to start building your new WordPress website.
- Find Help articles when you need them: Here's the home page for Web Hosting (cPanel) help articles.
More info
- Your cPanel username and password are randomly generated during setup. You can change your password in the account Dashboard.
Passwords in Web Hosting (cPanel)
You might need to know two or three different passwords and usernames for your Web Hosting (cPanel) account. That's a lot! It's definitely better for keeping your account and website secure, but not so easy to manage. Here are a few important things to know about those passwords.
Your Wurk account password and cPanel password aren't the same thing
You set up a Wurk username and password when you set up your account with us, and you use them when you sign in to your Wurk account to get to your account Dashboard.
When we set up your Web Hosting (cPanel) account (also known as "provisioning"), we generate a cPanel username and password so we can set up cPanel for your account. You can't change that cPanel username, and we don't show you that password for security reasons.
You should change your cPanel password before you start using your account
Right after you set up your account, it's a good idea to change your cPanel password to something you know.before you start using the account. For example, if you know that password you can sign in directly to cPanel Admin without going through your account Dashboard.
Your cPanel username and password are exactly the same as your primary FTP username and password
If you're going to use FTP to move website files into your account. your FTP app will ask for a username and password. That's where to use your cPanel username and password - they're the same thing.
Or if your web designer/developer is going to move those files using FTP, then you need to give them the username and password to access your account. The best way to do this is to add another FTP user to the account. so you can specify a totally different username and password for that user. Then you can give those credentials to your web developer instead of "your" credentials.
Your WordPress username and password should be unique to WordPress
Whether you installed WordPress during provisioning or later with Instillation, you're asked to specify a WordPress username and password. You could make these the same as your account or cPanel credentials... but we don't recommend that. To keep your account and website secure, your WordPress username and password should be unique, and not the same as any other username or password.
- Here's how to change your WordPress password.
- If you lost or forgot your WordPress password, here's how to rese it
More info
- Browse a list of the most-visited Web Hosting (cPanel) Help article
- Access cPanel in my Webhosting (cPanel)
- See the Dashboard for my Web Hosting (cPanel) account
- Add Alias Domains to my Web Hosting (cPanel)
- Configuring DNS for your Web Hosting (cPanel) doma
Top Linux Hosting articles
Find the most popular articles right here
· See the Dashboard for my Web Hosting (cPanel) account
· Passwords in Web Hosting (cPanel)
· Manually install an SSL certificate on my Web Hosting (cPanel) plan or VPS Hosting.
· Redirect HTTP to HTTPS automatically
· Move my cPanel website with FTP and FileZilla
· Redirect my website to HTTPS using cPanel
· What is a subdomain?
Copy files to my site
Learn about FTP and upload your website files
What is FTP?
File Transfer Protocol (FTP) is a standard communication protocol used to move files between an app on your local computer and a remote server. You can use the standard FTP on our Web Hosting, Web Hosting Plus, and Windows Hosting plans.
Our Managed WordPress plans use Secure File Transfer Protocol (SFTP) which uses the SSH protocol for file transfer instead of FTP. It's essentially the same as FTP but with the added security of both the commands and data being encrypted. This feature prevents passwords and sensitive information from being transmitted openly over the internet.
To use FTP, you'll need an FTP app. There are many different clients you can use, but we recommend FileZilla. The FTP app FileZilla is also compatible with SFTP; you'll need to specify port 22 instead of port 21, which is used by FTP.
Note: Our Web Hosting, Web Hosting Plus, and Windows Hosting plans support passive mode FTP. This setting can be managed in most FTP apps and website design software that support publishing with FTP. Managed WordPress uses SFTP, which only supports active mode, so no changes need to be made to the active mode setting in your FTP app.
Next steps
How you move your files depends on the type of hosting account you have
- Web Hosting (cPanel): Move my cPanel website with FTP and FileZila
- Windows Hosting (Plesk): Upload files to my Windows Hosting account with FTP and FileZilla.
- Managed WordPress: Upload files with SFTP on Managed WordPress hosting.
What is Website Backup?
Website Backup allows you to back up your site and related database via FTP, SFTP, FTPS, or SSH key to a secure cloud location.
Backups start as soon as you set up your account.
You can choose how frequently and at what time your backups are created to minimize impact to your server resources.
Backups are retained for 90 days. This means you can restore your site to the state of any day with a successful backup during the last 90 days. You can also download copies of your backups to local storage for emergency access or site migration.
When you need to use your backup, you can restore specific files or restore all of them.
Next steps
- Purchase Website Backup
- Configure my website Security backups
- What Website Security backups?
Move my cPanel website with FTP and FileZilla
You can upload or backup your website by moving a copy of your files between your computer and your Web Hosting (cPanel) account with File Transfer Protocol (FTP). Most FTP client apps will work, and these steps explain how to use FileZilla.
Before you start, you need this information:
- The IP address for your website, or its domain name.
- Your FTP username (same as your cPanel login name).
- Your FTP password. If you can't remember it here's how to reset that password
Got all that info? Let's get started!
- Launch FileZilla and complete these fields:
|
Field |
What to enter... |
|
Host |
Your IP address, or the domain name |
|
Username |
Your FTP username |
|
Password |
Your FTP password |
|
Port |
21 |
- Click Quickconnect. FileZilla connects to your hosting account.

- In the Remote site section, open your website's root directory. For your primary domain name, that's the public_html folder. The root directory might be different for a secondary or addon domain.
- In the Local site section, open the location on your computer where you store your website files locally.
To upload your files: In the Local site section, select all of your website's files and directories and drag them into the Remote site section. Once the files have been moved, your site is live.
Or, to download your files: In the Remote site section, select all of your website's files and directories and then drag them into the Local site section. After the files have been moved, you'll have a backup of your website saved on your computer.
More info
- Uploading and downloading your website or your entire hosting account can take a while, depending on the size of your site and your internet connection.
- Here's how to find the root directory for a secondary or addon domain.
- If your website uses databases (such as MySql or MSSQL), make sure that you also make a backup of those databases to create a full backup.
- For hassle-free backups, learn about our paid Website Backup service.
Note: As a courtesy, we provide information about how to use certain third-party products, but we do not endorse or directly support third-party products and we are not responsible for the functions or reliability of such products. Third-party marks and logos are registered trademarks of their respective owners. All rights reserved.
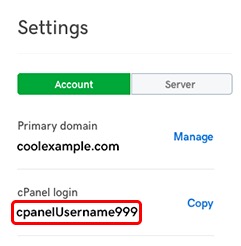
Find my FTP username for Web Hosting (cPanel)
To upload content to your Web Hosting (cPanel) website, you need your FTP username, which is the same as your cPanel login.
Note: Need help from a Wurk Guide? On our Contact page, click Chat Now for guidance 24/7.
- Go to your Wurk product page
- Under Web Hosting, next to the Web Hosting (cPanel) account you want to use, click Manage.

- In the account Dashboard, in the Settings section, find your cPanel login.
Related steps
- For help with your cPanel password see Change my primary FTP password in Web Hosting (cPanel)
More info
- Move my cPanel website with FTP and FileZilla
- In cPanel, you can't change FTP account usernames or their paths. Instead, you need to remove an FTP account and create a new one.
Add FTP users to my Web Hosting (cPanel) account
To give others access to your Web Hosting (cPanel) account, add them as FTP users so they can also upload files or manage your site. You can limit what these users can access, and how much they can upload.
- Go to your Wurk product page.
- Under Web Hosting, next to the Web Hosting (cPanel) account you want to use, select Manage.
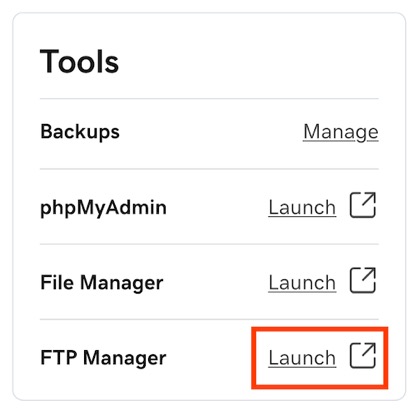
- In the lower-right corner of the account Dashboard, select FTP Manager from the Tools section.

- In the cPanel FTP Accounts page, below Add FTP Account, complete these fields:
|
Field |
What it means... |
|
Log in |
The first part of your username. The full username includes @[your account's primary domain name]. So if your primary domain is coolexample.com, and you enter ftpuser, then the full username for FTP will be ftpuser@coolexample.com. |
|
Password |
The password for this FTP user. |
|
Directory |
The directory this user can access. To give this user access to the entire account, enter nothing but a forward slash (/). |
|
Quota |
Total size of the files (in MB) this user can upload to that directory. Select Unlimited for no limit. Existing files in a directory count towards the quota. |
- Select Create FTP Account.
Repeat these steps for any other users you want to add. You can have up to 50 FTP users for Economy and Deluxe accounts, and an unlimited number for Ultimate accounts.
Related steps
- Your new FTP users can upload files with FileZilla.
More info
- For more help, see the cPanel documentation for the FTP Accounts feature.
- Need to find out which plan you have? See What type of hosting account do I have?
Edit FTP users in my Web Hosting (cPanel) account
Use the cPanel FTP manager to edit the password and quota for FTP users in your Web Hosting (cPanel) account.
- Go to your Wurk product page
- Under Web Hosting, next to the Web Hosting (cPanel) account you want to use, select Manage.
- In the upper left corner of the account Dashboard, select FTP Manager.

- In the cPanel FTP Accounts page, in the FTP Accounts section, next to the FTP user account you want to edit, select either Change Password or Change Quota.
- Make your changes and then select Change Password or Change Quota.
More info
- You can't edit the path to the working directory for an FTP user account in cPanel. You must delete the user account, create a new one, and assign a new working directory to the new account. For more information, see Remove FTP users from my Web Hosting (cPanel) account and Add FTP users to my Web Hosting (cPanel) account.
- For help with cPanel, see the cPanel documentation for the FTP Accounts feature
Enable SSH for my Web Hosting (cPanel) account
SSH is a secure method of connecting to your Web Hosting (cPanel) account to move files and execute commands. Follow these steps to enable SSH for your account - you don't need to configure any public or private keys.
Note: Need help? Contact a Wurk Guide for assistance.
- Go to your Wurk product page.
- Under Web Hosting, next to the Web Hosting (cPanel) account you want to use, select Manage.
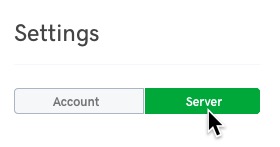
- In the account Dashboard, under Settings select Server.
- Next to SSH access, select Manage.
- Select the SSH access switch to turn it on. The switch turns green and your SSH credentials appear in the list. Use these credentials to log in to cPanel via SSH.
Note: Your cPanel password doubles as your SSH password. If you're not sure what your cPanel password is, you can change it right here. Be sure to write it down since it can't be viewed in your account dashboard.
Related steps
- Now you can connect via a SSH client.
More info
- Change my primary FTP password in Web Hosting (cPanel)
- Find my FTP username for Web Hosting (cPanel)
Publish my website
(Choose a content management system (CMS) to build your website online and preview your website)
Install web applications in my Web Hosting (cPanel) account
When it's time to add web applications (like WordPress or Joomla) to your Web Hosting (cPanel) account, follow these steps to use Installatron.
Note: Got a website with another host? If you're moving the site to Wurk, you can save some time by importing the applications you’re already using from that site.
- Go to your Wurk product page
- Under Web Hosting, next to the Web Hosting (cPanel) account you want to use, select Manage.
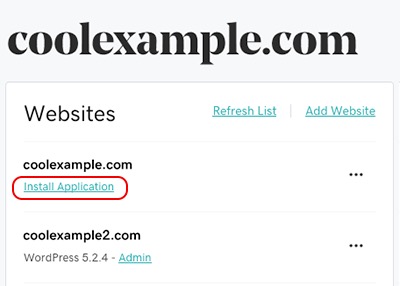
- In the account Dashboard, under Websites, below the domain select Install Application.
- In the Installatron Applications Browser, select the application you want to install and the information page for that app appears.
- Select + install this application. Or, if you decide not to install this app, select your browser's Back button and repeat the previous step.
- Complete the fields and selections, and then select + Install.
More info
- You can find information about using Installatron in their Website Owner documentation.
Move a web application to my Web Hosting (cPanel) account
If you're using a web application like WordPress or Joomla with your website on another host (or another Wurk account), you can import that app and its data into your Web Hosting (cPanel) plan. You can move an entire website this way.
Note: Need help? Contact our Wurk Guides for information on our paid content migration service.
Before you import the web app, you'll need a few pieces of information from your previous host:
- Your FTP or SFTP username and password for the previous host.
- The file path to your website on the previous host.
- The IP address for your previous host.
Got all that info? Let's get started!
- Go to your Wurk product page.
- Under Web Hosting, next to the Web Hosting (cPanel) account you want to use, select Manage.
- In the account Dashboard, select cPanel Admin.
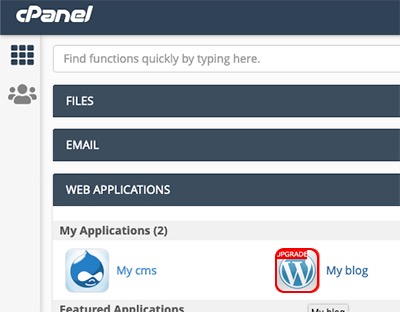
- In the cPanel home page, select Web Applications, and below My Applications select the application you want to move (for example, WordPress in the screenshot below).

- Next to + install this application, select
 and then select import existing install.
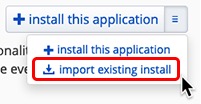
- In the Installatron Import page, below From different account, select Continue.
- Complete the Source and Destination sections.
|
Field |
Description |
|
URL |
The URL for your site as it is currently. This can be a domain (like http://www.coolexample.com), a subdomain (like http://subdomain.coolexample.com), or a domain and path (like http://www.coolexample.com/wordpress). |
|
Protocol |
Select FTP. |
|
Server (IP Address or Hostname) |
The IP address for the previous host. |
|
Port |
21 |
|
Username |
The FTP username for the previous host. |
|
Password |
The FTP password for the previous host. |
|
Path |
The path to your site, from the FTP user's root directory. This field may autofill depending on the web app you're importing. |
|
Domain |
From the menu, choose a domain or subdomain from your Web Hosting (cPanel) account. For a subdomain, select the version without the "www". |
|
Directory (optional) |
The specific directory and path you want for your website. Leave tis blank for a simple domain URL (like www.coolexample.com). If you want to use an additionalpath (like www.coolexample.com/sitename), then enter that path now. |
|
Database Management |
Select Automatically create a new database for the installed application. |
- Once you've confirmed that the information is correct, select Import.
Note: Problems at the source host, like timeouts or FTP issues, may cause the import to fail. If you get an Installatron message that the migration was unsuccessful, check the server IP address and your FTP credentials and try again. If you get an Installatron error regarding PHP modules, you may need to enable the PHP modules that are listed in the error message.
Related steps
- For more info on web apps, see the Installatron Applications Browser page.
More info
- Here's how to move this application to a new domain or directory on your Web Hosting (cPanel) account.
Preview your website using hosts files
Sometimes you need to preview your website files on your hosting account prior to pointing your domain to your hosting account. You can do this by adding entries to the hosts file on your local computer. Keep in mind that we don't support modifying your system files, you're doing so at your own risk.
Required: You'll need a third-party text editor, like Notepad++, to make any necessary changes. Don't edit this file directly in a word processing application like Microsoft Word.
- Start by finding the location of your host’s file:
|
OS |
hosts File Location |
|
Windows (10, 8, 7, XP, etc.) |
c:\windows\system32\drivers\etc\hosts |
|
Macintosh OS X |
/private/etc/hosts |
|
Web Hosting (cPanel) |
/etc/hosts |
- Now, add an entry to your hosts file for your domain and hosting account using the following format:
[your hosting account's IP address] [your domain name] [your domain name with www]
For example:
12.0.0.1 coolexample.com www.coolexample.com
- Save the changes to your hosts file and navigate to your domain name using your preferred browser. The website files on your hosting account will load, allowing you to preview your website.
Warning: After you're done previewing your website, and pointing your domain name to your hosting account, be sure to remove the entry from your host’s file. If you don't remove the entry and change plans or servers in the future, you won't be able to view your site.
More info
If you don't know the IP address of your hosting account, but you know what kind of hosting you have you can find out your IP address using the links below:
- Web Hosting (cPanel)
- Windows Hosting (Plesk)
- Managed WordPress
Fine-tune my website
Manually install an SSL certificate, redirect URLs and add IP addresses
Install an SSL using AutoSSL on my Web Hosting (cPanel)
We’ve added AutoSSL, a cPanel feature which periodically scans your Web Hosting (cPanel) account and will automatically install a free DV SSL (or renew expired certificates) on domains that meet the install requirements. If needed for troubleshooting, you can also manually run AutoSSL.
Required: For AutoSSL to work on your domain you must:
· Add your domain to your cPanel account.
· Point your domain's DNS to your Web Hosting (cPanel) IP addressing (including Web Application Firewalls and Content Delivery Networks).
· Make sure existing SSL certificates on your domain are expired or uninstalled.
Note: AutoSSL is included with most Web Hosting (cPanel) plans. You can view our website for details.
- Sign in to your Wurk product page.
- Select Web Hosting. Then, next to the Linux Hosting account you want to use, select Manage.
- In the hosting account Dashboard, select cPanel Admin.
- On the cPanel home page, in the Security section, select SSL/TLS Status.
- Select the checkboxes for your desired domains, or select the top checkbox to select all.
- Select Run AutoSSL.
A success message will confirm your SSL successfully installed. Your AutoSSL certificates will automatically be renewed.
Related Steps
- Once AutoSSL has run, ensure your site is redirected to HTTPS.
More Info
What is AutoSSL?
AutoSSL is a free alternative to paid SSL certificates. Domains that meet the install requirements are automatically secured with a free, Domain Validated (DV) SSL certificate. Your SSL certificate stays updated and automatically renews.
Does my hosting plan have AutoSSL?
AutoSSL is available for Web Hosting (cPanel) Deluxe, Ultimate, and Maximum plans and all Web Hosting Plus plans.
How does AutoSSL work?
AutoSSL runs daily and automatically scans your cPanel account. When AutoSSL detects a domain that meets the install requirements, a free DV SSL will automatically install (or automatically renew for domains with expired certificates).
Required: The install requirements must be completed for AutoSSL to install an SSL to your domain.
What are the install requirements for AutoSSL?
For AutoSSL to work on your domain you must:
- Add your domain to your cPanel account.
- Point your domain's DNS to your Web Hosting (cPanel) IP address (including Web Application Firewalls and Content Delivery Networks).
- Make sure existing SSL certificates on your domain are expired or uninstalled.
Note: After an SSL is installed, ensure your domain is redirected to HTTPS to direct visitors to the secure and encrypted version of your site.
Can I manually run AutoSSL?
Yes. If you can’t wait for AutoSSL to run automatically and need your SSL immediately, manually install an SSL using AutoSSL.
How can I check if AutoSSL installed an SSL on my domain?
In your cPanel account, select SSL/TLS Status, and check the Certificate Status column for your domain. An AutoSSL Domain Validated status will confirm your free SSL is installed.
Is there a domain limit for AutoSSL?
There is no limit. AutoSSL will work for all domains that meet the install requirements.
My SSL installed but my browser says my domain is insecure
Ensure your domain is redirected to HTTPS to direct visitors to the secure and encrypted version of your site. If your domain is redirected to HTTPS but still showing as insecure, we recommend reading cPanel's documentation on mixed content errors.
More Info
· Install an SSL using AutoSSL on my Web Hosting (cPanel)
· Learn more about AutoSSL and SSL/TLS Status from cPanel
Manually install an SSL certificate on my Web Hosting (cPanel) plan or VPS Hosting
Not the right server type? Go back to the list of installation instructions.
After your certificate request is approved, you can download your certificate from the SSL manager and install it on your Web Hosting (cPanel) plan.
Required: Deluxe and extended validation (EV) certificates, as well as SSLs for addon domains or subdomains must be installed manually.
Note: Want Wurk to install and maintain your SSL for you? Consider purchasing a Managed SSL.
- If you haven't done it already, download your certificate from the SSL manager and save the
.crtfile somewhere that's easy to find. - Go to your Wurk product page.
- Select Web Hosting and then select Manage for the Web Hosting (cPanel) plan you're installing the SSL on.
- Select cPanel Admin.
- In the Security section, select SSL/TLS.
- Under Certificates (CRT), select Generate, view, upload, or delete SSL certificates.
- In the Upload a New Certificate section, select Choose File and navigate to the
.crtfile you downloaded in step 1. Select the file and then select Open. - If you want to, type a description of the certificate in the Description text box.
- Select Upload Certificate.
- When you get confirmation that the certificate has been saved, select Go Back.
- At the bottom of the SSL Certificates page, select Return to SSL Manager.
- Under Install and Manage SSL for your site (HTTPS), select Manage SSL Sites.
- In the Install an SSL Website section, select Browse Certificates.
- Select the certificate that you want to activate and select Use Certificate. This will auto-fill the fields for the certificate.
- At the bottom of the page, select Install Certificate.
- On the Successfully Installed pop up, select OK.
Your certificate is installed! Now you need to direct visitors to the secure version of your site by redirecting to HTTPS
Redirect my website to HTTPS using cPanel
After your SSL certificate is installed on your Web Hosting (cPanel) account, you'll need to automatically redirect your visitors to the HTTPS version of your website. You can enable an HTTPS redirect (without coding) in your cPanel account.
Required: Your site must have a valid SSL installed and its DNS pointed to your Linux Hosting account for the automatic redirect to function.
- Go to your Wurk product page.
- Under Web Hosting, next to the Web Hosting (cPanel) account you want to use, select Manage.
- In the account Dashboard, select cPanel Admin.
- In the Domains section, select Domains.
- Under Force HTTPS Redirect, turn on the toggle for the domain you want to redirect.
A success message will appear to confirm your site is being redirected to HTTPS. You may need to wait a few minutes or clear your browser’s cache for the change to be visible.
More info
- If you don't want to deal with setting up SSL yourself, our Managed SSL Service can help.
- You can also redirect to HTTPS using a WordPress plugin or your site's .htaccess file
- Install web applications in my Web Hosting (cPanel) account
- Add a dedicated IP address
Work with databases
Import, export, and connect to MySQL databases
Find your database hostname
If your website uses a database to store content (e.g. WordPress, Drupal), you will need your database hostname to connect your site to your database.
To find your database hostname, check your hosting account type, and choose the correct option from the table below.
|
Hosting Type |
Database hostname |
|
Web Hosting (cPanel) |
Use localhost |
|
Windows Hosting (Plesk) |
Find database details |
|
Managed WordPress |
Find database details |
Related steps
- If you use Web Hosting (cPanel), you can get your database name, username, and password by viewing your database details.
More info
- If you use WordPress and have the Error establishing a database connection on your site, you should update your connection strings once you have the correct database details.
Import SQL files into a MySQL database
If you backed up (or exported) a database as an SQL file, you can import it into one of your hosting account's MySQL databases through phpMyAdmin.
Note: If your database is overly large or has many tables, you’ll need to import it through SSH.
- Sign in to phpMyAdmin
- On the left menu, select the name of the database you want to use.
Note: If you see only information schema, you should create a database in your Web Hosting (cPanel) or Windows Hosting (Plesk) account.
- On the top menu, select Import.

- Select Choose file.
- Find and select the file you want to import and then select Open.
- At the bottom of the page, select Import.
It might take several minutes for the import to complete and update the database as specified in your SQL file.
More info
- Export MySQL databases
- Visit the phpMyAdmin site to learn more
Export MySQL databases
You can export your MySQL database to import into another database server or store locally as a backup. Follow these steps to export the MySQL database to a file and download it to your computer.
Note: If you're working with a large database or a database with a large number of records in a table, you'll need to use Secure Socket Shell (SSH) to export the MySQL database.
- Sign in to phpMyAdmin.
- On the phpMyAdmin home page, from the menu on the left, select the database you want to export.

- From the tabs at the top of the page select Export.

- (Optional) If you want to change some of the advanced settings, under Export method select Custom - display all possible options. Otherwise, leave it at default Quick - display only the minimal options.
- Under Format, ensure that SQL is selected.
- Select Export.
You have successfully exported the MySQL database to your computer.
More info
- Import SQL files into MySQL databases
- Visit the phpMyAdmin site to learn more
Log in to phpMyAdmin in my Web Hosting (cPanel) account
Here's how to log in to phpMyAdmin to manage your MySQL databases. You can change database values, run queries, and create, view or modify your database structure. Be sure you back up your database before modifying it.
Note: Programs like WordPress and Joomla provide their own interface for modifying most aspects of a database. If you are using one of these programs, you probably don't need to use phpMyAdmin to manage the database unless specifically instructed to.
- Go to your Wurk product page.
- Under Web Hosting, next to the Web Hosting (cPanel) account you want to use, select Manage.
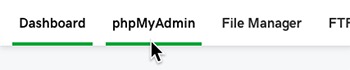
- In the upper left corner of the account Dashboard, select phpMyAdmin.
The phpMyAdmin home page for your account appears.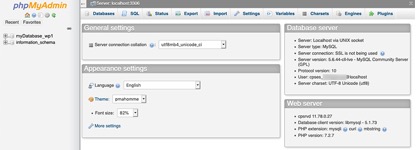
More info
- For help with using phpMyAdmin, see the phpMyAdmin documentation.
Create an admin user in the WordPress database
You can create a new WordPress admin user from within the database. Use this method if your original admin user was corrupted or removed.
Warning: You should always back up your site before making changes to the database.
- Sign in to phpMyAdmin
- In phpMyAdmin, in the left-side menu, select the name of the database your site uses.
- Under Table, look for the users table and select it by selecting the name not the checkbox. The table name is preceded by a table prefix (for example, your users table might be called wp_users or wp_1wsryb9585_users).
- From the top menu, select Insert.
- In the Value column, enter the following:
|
Field |
Value to enter |
|
ID |
Any number that is not already used by another user. Make note of this number since you'll need to use it when you create the wp_usermeta table entry. |
|
user_login |
Username for accessing the WordPress dashboard. |
|
user_pass |
Password for this user. Warning: Make sure to select MD5 in the Function column. |
|
user_nicename |
The nickname for this user. |
|
user_email |
Email address for this user. |
|
user_registered |
Select the calendar icon and then select the date and time this user was registered. |
|
user_status |
Set this to 0. |
|
display_name |
Name that will display for this user. |
- On the right, select Go.
- On the left-side menu, select the name of the database your site uses (repeat Step 2).
- Under Table, look for the usermeta table and note the table prefix to use it in the upcoming steps (for example, if your usermeta table is called wp_usermeta, your prefix is wp_ and if it's called wp_1wsryb9585_usermetathe prefix is wp_1wsryb9585_, and so on).
- Select the usermeta table by selecting the name not the checkbox.
- From the top menu, select Insert.
- In the Value column, enter the following:
|
Field |
Value to enter |
|
user_id |
Enter the ID from step 5. |
|
meta_key |
Enter the word capabilities preceded by the database prefix noted in Step 8 (for example, if your database prefix was wp_, enter wp_capabilities, if it's wp_1wsryb9585_, enter wp_1wsryb9585_capabilities and so on). |
|
meta_value |
Copy and enter the following: a:1:{s:13:"administrator";s:1:"1";}
|
- On the right, select Go.
- Select the Insert tab again.
- In the Value column, enter the following:
|
Field |
What it is... |
|
user_id |
Enter the ID from step 5. |
|
meta_key |
Enter the word user_level preceded by the database prefix noted in Step 8 (for example, if your database prefix was wp_, enter wp_user_level, if it's wp_1wsryb9585_, enter wp_1wsryb9585_user_level and so on). |
|
meta_value |
Enter number 10. |
- On the right, select Go.
You can now sign in to WordPress with your new username and password.
Note: To be able to sign into WordPress with a new user, your sign-in page has to work properly. If there's an error on the sign-in page, you'll have to fix the error first.
More Info
- Here's what to do if you're unable to sign in to WordPress.
Unable to sign in to WordPress
If you can't access your WordPress dashboard, it's usually because the password you're using is not correct, or your WordPress user isn't set up correctly. To regain access to your dashboard, update your WordPress password and, if this doesn't help, create a new WordPress user and try signing in with the new username and password.
Note: This article describes ways to regain access to your WordPress dashboard when the sign in page loads correctly. If you see an error on the page, you should resolve the error first.
Try private browsing mode
Before you start troubleshooting, use private browsing mode in Chrome, Firefox, or Edge browsers to try to sign in. This will eliminate the possibility that the issue is caused by your browser.
Update your WordPress password
There are several ways to update your WordPress password. Typically, you can perform this from within your WordPress dashboard. However, when you can't access the dashboard, you can choose one of the options below.
|
Options |
Difficulty |
|
Reset my WordPress password |
Easy |
|
Change a WordPress password with SSH |
Medium |
|
Change your WordPress password with WP-CLI |
Hard |
|
Change my WordPress password in the database |
Hard |
Create a new WordPress admin user
If you still can't sign in to your dashboard after you have changed the password, it's possible that something is wrong with your user's setup. That's when creating a new WordPress admin user in the database can help.
More Info
- Check out the solutions provided in the official WordPress documentation.
- If you don't want to deal with fixing this issue yourself, our WordPress Premium Support team can do that for you
- If you need any assistance with creating or managing WordPress users, our WordPress Prmium Support team can help.
Use PHP scripts and applications
Build a feature-rich website with PHP
PHP upload limits on shared hosting
Your default PHP upload limit depends on the type of hosting account you have (What type of hosting account do I have?)
|
Type |
Default upload limit |
Max |
|
Web Hosting (cPanel) |
32MB |
128MB |
|
Windows Hosting (Plesk) |
2MB |
2GB |
|
Managed WordPress |
100MB |
192MB |
The upload limit does not guarantee an upload will complete — only that it isn't rejected by the server. Uploads beneath the upload limit can still fail because of:
- Upload speed, which can cause your PHP script or browser to time out.
- Your account's resource availability, which can cause large files to fail.
Change your PHP upload limit
To change the limitation, edit or add the following values in your PHP initialization file (What filename does my PHP initialization file need to use?)
The following settings change your PHP upload limit, allowing you to upload files up to 50MB in size. Setting the PHP upload limit higher than the Max listed above will force the setting to use the default upload limit instead.
file_uploads = On
post_max_size = 50M
upload_max_filesize = 50M
More info
- Change PHP upload limits for my Web Hosting (cPanel) account
- What filename does my PHP initialization file need to use?
- Increase the WordPress memory limit
- Edit files in Windows Hosting
Change PHP settings for my hosting account
If the default PHP settings for your hosting account don't meet the requirements of your website or application, follow these steps to change your PHP settings.
Note: All of our shared hosting platforms use a .user.ini file for PHP directives. Not all INI settings can be changed in a .user.ini. Changes are limited to settings with the modes PHP_INI_PERDIR and PHP_INI_USER from the list of php.inidirectives at PHP.net.
- Read our article about PHP initialization file
- Access the File Manager Web Hosting (cPanel) |Windows Hosting (Plesk) | Managed WordPress | VPS
- Look for the .user.ini file in the root directory. That's the file you need to edit in the next step.
If you can't find that file in the root directory, use a text editor (for example, in cPanel use (File Manager)to create the file and then save it in the root directory. Be sure you name the file .user.ini.
- Edit the file:
Example:
memory_limit = 128M
max_input_vars = 2000
upload_max_filesize = 64M
post_max_size = 64M
max_execution_time = 120
Note: For more specific info on these PHP settings, see the PHP documentation for core php.ini directives.
- Use a phpinfo file to confirm the changes are complete.
More info
- Take a look at Web Hosting
- For more information about our premium support for WordPress, please visit our WP Premium Support Catalog.
Setup PHP error logging
When troubleshooting PHP errors, you will want to review your PHP logs. If you don't have PHP logs to review, use the following process to set up logging:
Note: For WordPress and Managed WordPress error logging please see Enable WordPress debug mode to display errors
- You should always backup your site before making any changes to your site.
- Locate your PHP initialization file.
- Edit the file. (Web Hosting (cPanel) / Windows Hosting (Plesk) / VPS Hosting)
- Place the following line in your initialization file:
error_log = /path/to/your/webroot/php_error.log
- error_log is the PHP function that will tell the web server to output your logs to a new file.
/path/to/your/webroot/php_error.logis the path to your new log.- Make sure to replace
/path/to/your/webrootwith the actual path your hosting account uses. - What is my absolute path? (Web Hosting (cPanel)/ Windows Hosting (Plesk)
- Create the a file named php_error.log in the in the webroot of your hosting.
- Restart your PHP processes (Web Hosting (cPanel)/ Windows Hosting (Plesk) Next steps
- Review your php_error.log for error details. (Web Hosting (cPanel)/ Windows Hosting (Plesk) / VPS Hosting)
More info
- For more information about PHP error logs, visit PHP.net
Increase the WordPress memory limit
Note: View Wurk Managed WordPress hosting plans
While working on your site, you may run into an issue that asks you to increase the WordPress memory limit. The easiest way to accomplish this is by editing your wp-config.php file.
Warning: You should always back up your site before making changes to the wp-config.php file.
- Access your WordPress files
- Locate the file wp-config.php in the root directory or folder.
- Double-click the wp-config.php file to open it.
- Select Edit.
- Find the following line:
/* That's all, stop editing! Happy publishing. */
- Right above the line in step five, add this code:
define('WP_MEMORY_LIMIT', '256M');

- Select Save.
You have successfully increased the WordPress memory limit.
More info
- An alternate method of increasing the WordPress memory limit is to edit your wp-config.php file via FTP.
Edit files in Windows Hosting
You can edit the contents of any text-based files on your Windows Hosting account.
Note: Before making changes, we recommend creating a copy of your files.
- Go to your Wurk product page.
- Below Web Hosting, next to the Windows Hosting account you want to use, select Manage.
- Select Plesk Admin.
- Select Files.
- In the list of files, select the file you want to edit and select Edit in Text Editor.
- Make your changes and select OK.
More info
- Create files in my Windows. Hosting account
- Create directories in y Windows Hosting account
What filename does my PHP initialization file need to use?
You can configure some of your PHP settings using a PHP initialization file. The file name your PHP initialization uses depends on the type of hosting account you have.
|
Hosting account type |
Filename |
Location |
|
Web Hosting (cPanel) |
.user.ini |
/public_html (one per account) |
|
Windows Hosting with Plesk |
.user.ini |
Website root (one per website) |
|
Managed WordPress |
.user.ini |
/html (one per website) |
Not all INI settings can be changed in a .user.ini. Changes are limited to settings with the modes PHP_INI_PERDIR and PHP_INI_USER from the list of php.ini directives at php.net.
Related steps
- To see changes you made to the .user.ini file, check the PHP settings with a phpinfo file
More info
- What is a .user.ini. file?
- See the PHP documentation for more info on PHP files
Troubleshoot
Check here for help with common cPanel hosting issues
Common web page errors
HTTP status codes are three-digit numbers that provide Web browsers with information about the page's status. You might see some of these errors while browsing the Internet, or you might have received them in your own hosting account.
Here's a quick guide to help you understand the most common error codes with suggestions for what to do to fix the error:
400 — Bad Request
The Web server couldn't parse a malformed script. Most often, programming problems cause this issue. You should talk to your developer or software provider for help resolving this issue.
401 — Authentication Required
This page requires a user name and password to access it. If you try to access it without it, you get a 401 — Authentication Required message.
403 — Forbidden
Forbidden errors display when somebody tries to access a directory, file, or script without appropriate permissions. For example, if a script is readable only to the user and others cannot access the file, they'll see a 403 error.
Invalid index files and empty directories can also cause 403 errors. For more information, see one of the following articles based on the type of hosting account you have: Web Hosting (cPanel) / Windows Hosting with Plesk.
404 — Not Found
If visitors access URLs that don't exist, they receive 404 errors. The cause can be anything from invalid URLs, missing files, or redirects to URLs that no longer exist.
500 — Internal Server Error
This is a very general error that means there's a problem with the website displaying, but the details aren't readily available. Invalid .htaccess files, or invalid rules in them, commonly cause 500 errors with Web Hosting (cPanel) accounts. With Windows Hosting, it's most commonly invalid requests through a web.config file.
To find out what causes the issue:
- Linux — Review your Apache error logs.
- Windows — Enable detailed errors in your
web.configfile using the following code:
· <configuration>
· <system.webServer>
· <httpErrors errorMode="Detailed"/>
· </system.webServer></configuration>
For more information, check out the list of status code definitions at rfc-editor.org.
My website was hacked. What should I do?
A hacked website is really frustrating — it's troublesome for your business and visitors, and removing a hack can be time-consuming. Let's go through the fastest and easiest way to fix your website.
Let's check for warnings
If you've seen "This site contains malware" or "The site ahead contains harmful programs" in connection with your site, there's definitely a problem. To check further, visit a site like Sucuri SiteCheck scanner and enter your domain name.
- If your website's been hacked, you'll see a warning here.
- No warning? It's less likely (but still possible) that your website has been compromised.
Note: Sucuri SiteCheck is a free website security scanner. Remote scanners have limited access and results are not guaranteed.
Change your passwords
If your site's been hacked, you need to immediately change all your passwords.
Note: To make sure you use the right instructions, find out what type of type of hosting account you have.
|
Your hosting type |
Passwords to reset |
|
Web Hosting (cPanel) |
Primary FTP, secondary FTP, database, apps like WordPress or Joomla |
|
Windows Hosting (Plesk) |
Primary FTP, secondary FTP, database, apps like WordPress or Joomla |
Restore from backup
If you have a backup of your website (and database) that you know wasn't corrupted, you should re-upload it to your hosting account.
If you have Website Backup, you can easily do this for your cPanel or Plesk account.
If you don't have a backup tool, after resolving the issue we recommend adding Website Backup to your account.
Remove the hack
It's nearly impossible for anyone to reliably remove malware from a website by hand. To prevent your site from being compromised, we recommend using a Website Security plan that monitors and protects your website from malware and other potential security breaches.
Identify & fix the weakness
To prevent your site from getting hacked again, you should identify how your site was compromised. There are two types of weaknesses: passwords and structural problems.
Passwords
Most hacks happen because the attacker was able to guess your account's password by brute force. By simply changing your password (and using a stronger one this time), you can prevent these attacks from succeeding in the future.
Structural
These types of weaknesses require thorough testing to identify. There's a lot of security software that can perform these types of scans but, again, we recommend Sucuri SiteCheck scanner. Please note that remote scanners have limited access and results are not guaranteed.
WURK (Linux Hosting (cPanel)
FREQUENTLY ASKED QUESTIONS
Discover Linux Hosting with cPanel
Browse a list of Linux Hosting articles and learn to set up your account
Hosting (cPanel) articles
Here’s a round-up of the most-visited articles for Web Hosting (cPanel) with cPanel. Use it as your guide—from the basic steps of setting up your hosting and uploading content, right through more advanced topics like database management and changing PHP settings.
Set up my Web Hosting (cPanel) account
After you purchase a Web Hosting (cPanel) plan, you need to set it up before you can use it to host your website.
Warning: Setting up an account can change a domain's DNS records, so existing websites and email addresses might stop working. For help finding the best path, on our Contact Us
- Go to your Wurk product page.
- Under Web Hosting, next to the Web Hosting (cPanel) account you want to set up, click Set up.

- Complete the on-screen fields, and then click Finish.
- We'll ask you which of your domains you want to associate with the account as your primary domain. You can also specify a subdomain if you like.
- We'll ask if you'd like to install WordPress during setup. If so, you'll set your WordPress username and password at that time.
- If you're setting up your account with an Internationalized Domain Name, you'll need to enter the Punycode version of the domain name.
When setup is complete, your account Dashboard appears. Your primary domain name appears at the top.
Next steps
- Change your cPanel password to something you know: We auto-generated a cPanel login name and password to set up cPanel for your account. We can't show you that password for security reasons. Before you start using the account, it's a good idea to change your cPanel password to something you know
- Learn more about your new Web Hosting (cPanel) account: Take our Guided Tour of the account Dashboard, WordPress, and cPanel.
- Install an SSL certificate: Planning an online store? Then you've got to have a secure website. Here's our path for requesting and installing an SSL certificate
- Set up website backups: Backing up your site is a great way to protect your content and data if there's a real problem. You can set up backups yourself in cPanel, or let us handle that for you with our Website Backup service.
- Start building your site with WordPress: Check out our list of the basics you need to start building your new WordPress website.
- Find Help articles when you need them: Here's the home page for Web Hosting (cPanel) help articles.
More info
- Your cPanel username and password are randomly generated during setup. You can change your password in the account Dashboard.
Passwords in Web Hosting (cPanel)
You might need to know two or three different passwords and usernames for your Web Hosting (cPanel) account. That's a lot! It's definitely better for keeping your account and website secure, but not so easy to manage. Here are a few important things to know about those passwords.
Your Wurk account password and cPanel password aren't the same thing
You set up a Wurk username and password when you set up your account with us, and you use them when you sign in to your Wurk account to get to your account Dashboard.
When we set up your Web Hosting (cPanel) account (also known as "provisioning"), we generate a cPanel username and password so we can set up cPanel for your account. You can't change that cPanel username, and we don't show you that password for security reasons.
You should change your cPanel password before you start using your account
Right after you set up your account, it's a good idea to change your cPanel password to something you know.before you start using the account. For example, if you know that password you can sign in directly to cPanel Admin without going through your account Dashboard.
Your cPanel username and password are exactly the same as your primary FTP username and password
If you're going to use FTP to move website files into your account. your FTP app will ask for a username and password. That's where to use your cPanel username and password - they're the same thing.
Or if your web designer/developer is going to move those files using FTP, then you need to give them the username and password to access your account. The best way to do this is to add another FTP user to the account. so you can specify a totally different username and password for that user. Then you can give those credentials to your web developer instead of "your" credentials.
Your WordPress username and password should be unique to WordPress
Whether you installed WordPress during provisioning or later with Instillation, you're asked to specify a WordPress username and password. You could make these the same as your account or cPanel credentials... but we don't recommend that. To keep your account and website secure, your WordPress username and password should be unique, and not the same as any other username or password.
- Here's how to change your WordPress password.
- If you lost or forgot your WordPress password, here's how to rese it
More info
- Browse a list of the most-visited Web Hosting (cPanel) Help article
- Access cPanel in my Webhosting (cPanel)
- See the Dashboard for my Web Hosting (cPanel) account
- Add Alias Domains to my Web Hosting (cPanel)
- Configuring DNS for your Web Hosting (cPanel) doma
Top Linux Hosting articles
Find the most popular articles right here
· See the Dashboard for my Web Hosting (cPanel) account
· Passwords in Web Hosting (cPanel)
· Manually install an SSL certificate on my Web Hosting (cPanel) plan or VPS Hosting.
· Redirect HTTP to HTTPS automatically
· Move my cPanel website with FTP and FileZilla
· Redirect my website to HTTPS using cPanel
· What is a subdomain?
Copy files to my site
Learn about FTP and upload your website files
What is FTP?
File Transfer Protocol (FTP) is a standard communication protocol used to move files between an app on your local computer and a remote server. You can use the standard FTP on our Web Hosting, Web Hosting Plus, and Windows Hosting plans.
Our Managed WordPress plans use Secure File Transfer Protocol (SFTP) which uses the SSH protocol for file transfer instead of FTP. It's essentially the same as FTP but with the added security of both the commands and data being encrypted. This feature prevents passwords and sensitive information from being transmitted openly over the internet.
To use FTP, you'll need an FTP app. There are many different clients you can use, but we recommend FileZilla. The FTP app FileZilla is also compatible with SFTP; you'll need to specify port 22 instead of port 21, which is used by FTP.
Note: Our Web Hosting, Web Hosting Plus, and Windows Hosting plans support passive mode FTP. This setting can be managed in most FTP apps and website design software that support publishing with FTP. Managed WordPress uses SFTP, which only supports active mode, so no changes need to be made to the active mode setting in your FTP app.
Next steps
How you move your files depends on the type of hosting account you have
- Web Hosting (cPanel): Move my cPanel website with FTP and FileZila
- Windows Hosting (Plesk): Upload files to my Windows Hosting account with FTP and FileZilla.
- Managed WordPress: Upload files with SFTP on Managed WordPress hosting.
What is Website Backup?
Website Backup allows you to back up your site and related database via FTP, SFTP, FTPS, or SSH key to a secure cloud location.
Backups start as soon as you set up your account.
You can choose how frequently and at what time your backups are created to minimize impact to your server resources.
Backups are retained for 90 days. This means you can restore your site to the state of any day with a successful backup during the last 90 days. You can also download copies of your backups to local storage for emergency access or site migration.
When you need to use your backup, you can restore specific files or restore all of them.
Next steps
- Purchase Website Backup
- Configure my website Security backups
- What Website Security backups?
Move my cPanel website with FTP and FileZilla
You can upload or backup your website by moving a copy of your files between your computer and your Web Hosting (cPanel) account with File Transfer Protocol (FTP). Most FTP client apps will work, and these steps explain how to use FileZilla.
Before you start, you need this information:
- The IP address for your website, or its domain name.
- Your FTP username (same as your cPanel login name).
- Your FTP password. If you can't remember it here's how to reset that password
Got all that info? Let's get started!
- Launch FileZilla and complete these fields:
|
Field |
What to enter... |
|
Host |
Your IP address, or the domain name |
|
Username |
Your FTP username |
|
Password |
Your FTP password |
|
Port |
21 |
- Click Quickconnect. FileZilla connects to your hosting account.
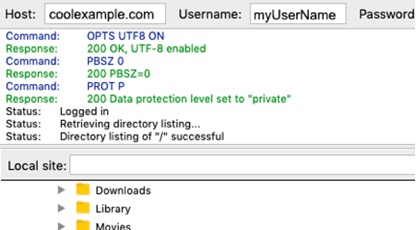
- In the Remote site section, open your website's root directory. For your primary domain name, that's the public_html folder. The root directory might be different for a secondary or addon domain.
- In the Local site section, open the location on your computer where you store your website files locally.
To upload your files: In the Local site section, select all of your website's files and directories and drag them into the Remote site section. Once the files have been moved, your site is live.
Or, to download your files: In the Remote site section, select all of your website's files and directories and then drag them into the Local site section. After the files have been moved, you'll have a backup of your website saved on your computer.
More info
- Uploading and downloading your website or your entire hosting account can take a while, depending on the size of your site and your internet connection.
- Here's how to find the root directory for a secondary or addon domain.
- If your website uses databases (such as MySql or MSSQL), make sure that you also make a backup of those databases to create a full backup.
- For hassle-free backups, learn about our paid Website Backup service.
Note: As a courtesy, we provide information about how to use certain third-party products, but we do not endorse or directly support third-party products and we are not responsible for the functions or reliability of such products. Third-party marks and logos are registered trademarks of their respective owners. All rights reserved.
Find my FTP username for Web Hosting (cPanel)
To upload content to your Web Hosting (cPanel) website, you need your FTP username, which is the same as your cPanel login.
Note: Need help from a Wurk Guide? On our Contact page, click Chat Now for guidance 24/7.
- Go to your Wurk product page
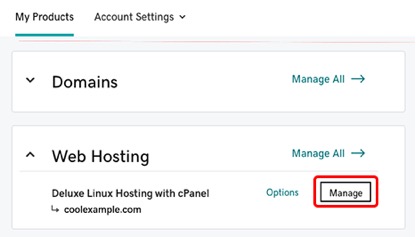
- Under Web Hosting, next to the Web Hosting (cPanel) account you want to use, click Manage.
- In the account Dashboard, in the Settings section, find your cPanel login.

Related steps
- For help with your cPanel password see Change my primary FTP password in Web Hosting (cPanel)
More info
- Move my cPanel website with FTP and FileZilla
- In cPanel, you can't change FTP account usernames or their paths. Instead, you need to remove an FTP account and create a new one.
Add FTP users to my Web Hosting (cPanel) account
To give others access to your Web Hosting (cPanel) account, add them as FTP users so they can also upload files or manage your site. You can limit what these users can access, and how much they can upload.
- Go to your Wurk product page.
- Under Web Hosting, next to the Web Hosting (cPanel) account you want to use, select Manage.
- In the lower-right corner of the account Dashboard, select FTP Manager from the Tools section.
- In the cPanel FTP Accounts page, below Add FTP Account, complete these fields:
|
Field |
What it means... |
|
Log in |
The first part of your username. The full username includes @[your account's primary domain name]. So if your primary domain is coolexample.com, and you enter ftpuser, then the full username for FTP will be ftpuser@coolexample.com. |
|
Password |
The password for this FTP user. |
|
Directory |
The directory this user can access. To give this user access to the entire account, enter nothing but a forward slash (/). |
|
Quota |
Total size of the files (in MB) this user can upload to that directory. Select Unlimited for no limit. Existing files in a directory count towards the quota. |
- Select Create FTP Account.
Repeat these steps for any other users you want to add. You can have up to 50 FTP users for Economy and Deluxe accounts, and an unlimited number for Ultimate accounts.
Related steps
- Your new FTP users can upload files with FileZilla.
More info
- For more help, see the cPanel documentation for the FTP Accounts feature.
- Need to find out which plan you have? See What type of hosting account do I have?
Edit FTP users in my Web Hosting (cPanel) account
Use the cPanel FTP manager to edit the password and quota for FTP users in your Web Hosting (cPanel) account.
- Go to your Wurk product page
- Under Web Hosting, next to the Web Hosting (cPanel) account you want to use, select Manage.
- In the upper left corner of the account Dashboard, select FTP Manager.

- In the cPanel FTP Accounts page, in the FTP Accounts section, next to the FTP user account you want to edit, select either Change Password or Change Quota.
- Make your changes and then select Change Password or Change Quota.
More info
- You can't edit the path to the working directory for an FTP user account in cPanel. You must delete the user account, create a new one, and assign a new working directory to the new account. For more information, see Remove FTP users from my Web Hosting (cPanel) account and Add FTP users to my Web Hosting (cPanel) account.
- For help with cPanel, see the cPanel documentation for the FTP Accounts feature
Enable SSH for my Web Hosting (cPanel) account
SSH is a secure method of connecting to your Web Hosting (cPanel) account to move files and execute commands. Follow these steps to enable SSH for your account - you don't need to configure any public or private keys.
Note: Need help? Contact a Wurk Guide for assistance.
- Go to your Wurk product page.
- Under Web Hosting, next to the Web Hosting (cPanel) account you want to use, select Manage.
- In the account Dashboard, under Settings select Server.

- Next to SSH access, select Manage.
- Select the SSH access switch to turn it on. The switch turns green and your SSH credentials appear in the list. Use these credentials to log in to cPanel via SSH.
Note: Your cPanel password doubles as your SSH password. If you're not sure what your cPanel password is, you can change it right here. Be sure to write it down since it can't be viewed in your account dashboard.
Related steps
- Now you can connect via a SSH client.
More info
- Change my primary FTP password in Web Hosting (cPanel)
- Find my FTP username for Web Hosting (cPanel)
Publish my website
(Choose a content management system (CMS) to build your website online and preview your website)
Install web applications in my Web Hosting (cPanel) account
When it's time to add web applications (like WordPress or Joomla) to your Web Hosting (cPanel) account, follow these steps to use Installatron.
Note: Got a website with another host? If you're moving the site to Wurk, you can save some time by importing the applications you’re already using from that site.
- Go to your Wurk product page
- Under Web Hosting, next to the Web Hosting (cPanel) account you want to use, select Manage.
- In the account Dashboard, under Websites, below the domain select Install Application.

- In the Installatron Applications Browser, select the application you want to install and the information page for that app appears.
- Select + install this application. Or, if you decide not to install this app, select your browser's Back button and repeat the previous step.
- Complete the fields and selections, and then select + Install.
More info
- You can find information about using Installatron in their Website Owner documentary
Move a web application to my Web Hosting (cPanel) account
If you're using a web application like WordPress or Joomla with your website on another host (or another Wurk account), you can import that app and its data into your Web Hosting (cPanel) plan. You can move an entire website this way.
Note: Need help? Contact our Wurk Guides for information on our paid content migration service.
Before you import the web app, you'll need a few pieces of information from your previous host:
- Your FTP or SFTP username and password for the previous host.
- The file path to your website on the previous host.
- The IP address for your previous host.
Got all that info? Let's get started!
- Go to your Wurk product page.
- Under Web Hosting, next to the Web Hosting (cPanel) account you want to use, select Manage.
- In the account Dashboard, select cPanel Admin.
- In the cPanel home page, select Web Applications, and below My Applications select the application you want to move (for example, WordPress in the screenshot below).
- Next to + install this application, select
 and then select import existing install.
- In the Installatron Import page, below From different account, select Continue.
- Complete the Source and Destination sections.
|
Field |
Description |
|
URL |
The URL for your site as it is currently. This can be a domain (like http://www.coolexample.com), a subdomain (like http://subdomain.coolexample.com), or a domain and path (like http://www.coolexample.com/wordpress). |
|
Protocol |
Select FTP. |
|
Server (IP Address or Hostname) |
The IP address for the previous host. |
|
Port |
21 |
|
Username |
The FTP username for the previous host. |
|
Password |
The FTP password for the previous host. |
|
Path |
The path to your site, from the FTP user's root directory. This field may autofill depending on the web app you're importing. |
|
Domain |
From the menu, choose a domain or subdomain from your Web Hosting (cPanel) account. For a subdomain, select the version without the "www". |
|
Directory (optional) |
The specific directory and path you want for your website. Leave tis blank for a simple domain URL (like www.coolexample.com). If you want to use an additionalpath (like www.coolexample.com/sitename), then enter that path now. |
|
Database Management |
Select Automatically create a new database for the installed application. |
- Once you've confirmed that the information is correct, select Import.
Note: Problems at the source host, like timeouts or FTP issues, may cause the import to fail. If you get an Installatron message that the migration was unsuccessful, check the server IP address and your FTP credentials and try again. If you get an Installatron error regarding PHP modules, you may need to enable the PHP modules that are listed in the error message.
Related steps
- For more info on web apps, see the Installatron Applications Browser page.
More info
- Here's how to move this application to a new domain or directory on your Web Hosting (cPanel) account.
Preview your website using hosts files
Sometimes you need to preview your website files on your hosting account prior to pointing your domain to your hosting account. You can do this by adding entries to the hosts file on your local computer. Keep in mind that we don't support modifying your system files, you're doing so at your own risk.
Required: You'll need a third-party text editor, like Notepad++, to make any necessary changes. Don't edit this file directly in a word processing application like Microsoft Word.
- Start by finding the location of your host’s file:
|
OS |
hosts File Location |
|
Windows (10, 8, 7, XP, etc.) |
c:\windows\system32\drivers\etc\hosts |
|
Macintosh OS X |
/private/etc/hosts |
|
Web Hosting (cPanel) |
/etc/hosts |
- Now, add an entry to your hosts file for your domain and hosting account using the following format:
[your hosting account's IP address] [your domain name] [your domain name with www]
For example:
12.0.0.1 coolexample.com www.coolexample.com
- Save the changes to your hosts file and navigate to your domain name using your preferred browser. The website files on your hosting account will load, allowing you to preview your website.
Warning: After you're done previewing your website, and pointing your domain name to your hosting account, be sure to remove the entry from your host’s file. If you don't remove the entry and change plans or servers in the future, you won't be able to view your site.
More info
If you don't know the IP address of your hosting account, but you know what kind of hosting you have you can find out your IP address using the links below:
- Web Hosting (cPanel)
- Windows Hosting (Plesk)
- Managed WordPress
Fine-tune my website
Manually install an SSL certificate, redirect URLs and add IP addresses
Install an SSL using AutoSSL on my Web Hosting (cPanel)
We’ve added AutoSSL, a cPanel feature which periodically scans your Web Hosting (cPanel) account and will automatically install a free DV SSL (or renew expired certificates) on domains that meet the install requirements. If needed for troubleshooting, you can also manually run AutoSSL.
Required: For AutoSSL to work on your domain you must:
· Add your domain to your cPanel account.
· Point your domain's DNS to your Web Hosting (cPanel) IP addressing (including Web Application Firewalls and Content Delivery Networks).
· Make sure existing SSL certificates on your domain are expired or uninstalled.
Note: AutoSSL is included with most Web Hosting (cPanel) plans. You can view our website for details.
- Sign in to your Wurk product page.
- Select Web Hosting. Then, next to the Linux Hosting account you want to use, select Manage.
- In the hosting account Dashboard, select cPanel Admin.
- On the cPanel home page, in the Security section, select SSL/TLS Status.
- Select the checkboxes for your desired domains, or select the top checkbox to select all.
- Select Run AutoSSL.
A success message will confirm your SSL successfully installed. Your AutoSSL certificates will automatically be renewed.
Related Steps
- Once AutoSSL has run, ensure your site is redirected to HTTPS.
More Info
What is AutoSSL?
AutoSSL is a free alternative to paid SSL certificates. Domains that meet the install requirements are automatically secured with a free, Domain Validated (DV) SSL certificate. Your SSL certificate stays updated and automatically renews.
Does my hosting plan have AutoSSL?
AutoSSL is available for Web Hosting (cPanel) Deluxe, Ultimate, and Maximum plans and all Web Hosting Plus plans.
How does AutoSSL work?
AutoSSL runs daily and automatically scans your cPanel account. When AutoSSL detects a domain that meets the install requirements, a free DV SSL will automatically install (or automatically renew for domains with expired certificates).
Required: The install requirements must be completed for AutoSSL to install an SSL to your doma
What are the install requirements for AutoSSL?
For AutoSSL to work on your domain you must:
- Add your domain to your cPanel account.
- Point your domain's DNS to your Web Hosting (cPanel) IP address (including Web Application Firewalls and Content Delivery Networks).
- Make sure existing SSL certificates on your domain are expired or uninstalled.
Note: After an SSL is installed, ensure your domain is redirected to HTTPS to direct visitors to the secure and encrypted version of your site.
Can I manually run AutoSSL?
Yes. If you can’t wait for AutoSSL to run automatically and need your SSL immediately, manually install an SSL using AutoSSL.
How can I check if AutoSSL installed an SSL on my domain?
In your cPanel account, select SSL/TLS Status, and check the Certificate Status column for your domain. An AutoSSL Domain Validated status will confirm your free SSL is installed.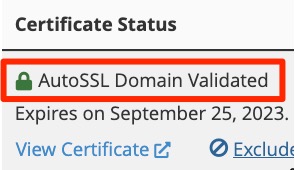
Is there a domain limit for AutoSSL?
There is no limit. AutoSSL will work for all domains that meet the install requirements.
My SSL installed but my browser says my domain is insecure
Ensure your domain is redirected to HTTPS to direct visitors to the secure and encrypted version of your site. If your domain is redirected to HTTPS but still showing as insecure, we recommend reading cPanel's documentation on mixed content errors.
More Info
· Install an SSL using AutoSSL on my Web Hosting (cPanel)
· Learn more about AutoSSL and SSL/TLS Status from cPanel
Manually install an SSL certificate on my Web Hosting (cPanel) plan or VPS Hosting
Not the right server type? Go back to the list of installation instructions.
After your certificate request is approved, you can download your certificate from the SSL manager and install it on your Web Hosting (cPanel) plan.
Required: Deluxe and extended validation (EV) certificates, as well as SSLs for addon domains or subdomains must be installed manually.
Note: Want Wurk to install and maintain your SSL for you? Consider purchasing a Managed SSL.
- If you haven't done it already, download your certificate from the SSL manager and save the
.crtfile somewhere that's easy to find. - Go to your Wurk product page.
- Select Web Hosting and then select Manage for the Web Hosting (cPanel) plan you're installing the SSL on.
- Select cPanel Admin.
- In the Security section, select SSL/TLS.
- Under Certificates (CRT), select Generate, view, upload, or delete SSL certificates.
- In the Upload a New Certificate section, select Choose File and navigate to the
.crtfile you downloaded in step 1. Select the file and then select Open. - If you want to, type a description of the certificate in the Description text box.
- Select Upload Certificate.
- When you get confirmation that the certificate has been saved, select Go Back.
- At the bottom of the SSL Certificates page, select Return to SSL Manager.
- Under Install and Manage SSL for your site (HTTPS), select Manage SSL Sites.
- In the Install an SSL Website section, select Browse Certificates.
- Select the certificate that you want to activate and select Use Certificate. This will auto-fill the fields for the certificate.
- At the bottom of the page, select Install Certificate.
- On the Successfully Installed pop up, select OK.
Your certificate is installed! Now you need to direct visitors to the secure version of your site by redirecting to HTTPS
Redirect my website to HTTPS using cPanel
After your SSL certificate is installed on your Web Hosting (cPanel) account, you'll need to automatically redirect your visitors to the HTTPS version of your website. You can enable an HTTPS redirect (without coding) in your cPanel account.
Required: Your site must have a valid SSL installed and its DNS pointed to your Linux Hosting account for the automatic redirect to function.
- Go to your Wurk product page.
- Under Web Hosting, next to the Web Hosting (cPanel) account you want to use, select Manage.
- In the account Dashboard, select cPanel Admin.
- In the Domains section, select Domains.
- Under Force HTTPS Redirect, turn on the toggle for the domain you want to redirect.
A success message will appear to confirm your site is being redirected to HTTPS. You may need to wait a few minutes or clear your browser’s cache for the change to be visible.
More info
- If you don't want to deal with setting up SSL yourself, our Managed SSL Service can help.
- You can also redirect to HTTPS using a WordPress plugin or your site's .htaccess file
- Install web applications in my Web Hosting (cPanel) account
- Add a dedicated IP address
Work with databases
Import, export, and connect to MySQL databases
Find your database hostname
If your website uses a database to store content (e.g. WordPress, Drupal), you will need your database hostname to connect your site to your database.
To find your database hostname, check your hosting account type, and choose the correct option from the table below.
|
Hosting Type |
Database hostname |
|
Web Hosting (cPanel) |
Use localhost |
|
Windows Hosting (Plesk) |
Find database details |
|
Managed WordPress |
Find database details |
Related steps
- If you use Web Hosting (cPanel), you can get your database name, username, and password by viewing your database details.
More info
- If you use WordPress and have the Error establishing a database connection on your site, you should update your connection strings once you have the correct database details.
Import SQL files into a MySQL database
If you backed up (or exported) a database as an SQL file, you can import it into one of your hosting account's MySQL databases through phpMyAdmin.
Note: If your database is overly large or has many tables, you’ll need to import it through SSH.
- Sign in to phpMyAdmin
- On the left menu, select the name of the database you want to use.
Note: If you see only information schema, you should create a database in your Web Hosting (cPanel) or Windows Hosting (Plesk) account.
- On the top menu, select Import.

- Select Choose file.
- Find and select the file you want to import and then select Open.
- At the bottom of the page, select Import.
It might take several minutes for the import to complete and update the database as specified in your SQL file.
More info
- Export MySQL databases
- Visit the phpMyAdmin site to learn more
Export MySQL databases
You can export your MySQL database to import into another database server or store locally as a backup. Follow these steps to export the MySQL database to a file and download it to your computer.
Note: If you're working with a large database or a database with a large number of records in a table, you'll need to use Secure Socket Shell (SSH) to export the MySQL database.
- Sign in to phpMyAdmin.
- On the phpMyAdmin home page, from the menu on the left, select the database you want to export.
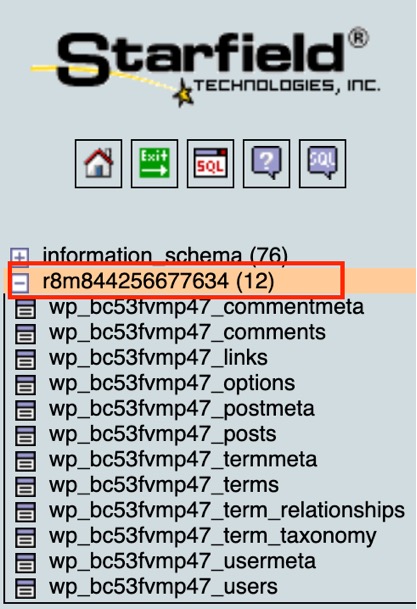
- From the tabs at the top of the page select Export.

- (Optional) If you want to change some of the advanced settings, under Export method select Custom - display all possible options. Otherwise, leave it at default Quick - display only the minimal options.
- Under Format, ensure that SQL is selected.
- Select Export.
You have successfully exported the MySQL database to your computer.
More info
- Import SQL files into MySQL databases
- Visit the phpMyAdmin site to learn more
Log in to phpMyAdmin in my Web Hosting (cPanel) account
Here's how to log in to phpMyAdmin to manage your MySQL databases. You can change database values, run queries, and create, view or modify your database structure. Be sure you back up your database before modifying it.
Note: Programs like WordPress and Joomla provide their own interface for modifying most aspects of a database. If you are using one of these programs, you probably don't need to use phpMyAdmin to manage the database unless specifically instructed to.
- Go to your Wurk product page.
- Under Web Hosting, next to the Web Hosting (cPanel) account you want to use, select Manage.
- In the upper left corner of the account Dashboard, select phpMyAdmin.

The phpMyAdmin home page for your account appears.
More info
- For help with using phpMyAdmin, see the phpMyAdmin documentation.
Create an admin user in the WordPress database
You can create a new WordPress admin user from within the database. Use this method if your original admin user was corrupted or removed.
Warning: You should always back up your site before making changes to the database.
- Sign in to phpMyAdmin
- In phpMyAdmin, in the left-side menu, select the name of the database your site uses.
- Under Table, look for the users table and select it by selecting the name not the checkbox. The table name is preceded by a table prefix (for example, your users table might be called wp_users or wp_1wsryb9585_users).
- From the top menu, select Insert.
- In the Value column, enter the following:
|
Field |
Value to enter |
|
ID |
Any number that is not already used by another user. Make note of this number since you'll need to use it when you create the wp_usermeta table entry. |
|
user_login |
Username for accessing the WordPress dashboard. |
|
user_pass |
Password for this user. Warning: Make sure to select MD5 in the Function column. |
|
user_nicename |
The nickname for this user. |
|
user_email |
Email address for this user. |
|
user_registered |
Select the calendar icon and then select the date and time this user was registered. |
|
user_status |
Set this to 0. |
|
display_name |
Name that will display for this user. |
- On the right, select Go.
- On the left-side menu, select the name of the database your site uses (repeat Step 2).
- Under Table, look for the usermeta table and note the table prefix to use it in the upcoming steps (for example, if your usermeta table is called wp_usermeta, your prefix is wp_ and if it's called wp_1wsryb9585_usermetathe prefix is wp_1wsryb9585_, and so on).
- Select the usermeta table by selecting the name not the checkbox.
- From the top menu, select Insert.
- In the Value column, enter the following:
|
Field |
Value to enter |
|
user_id |
Enter the ID from step 5. |
|
meta_key |
Enter the word capabilities preceded by the database prefix noted in Step 8 (for example, if your database prefix was wp_, enter wp_capabilities, if it's wp_1wsryb9585_, enter wp_1wsryb9585_capabilities and so on). |
|
meta_value |
Copy and enter the following: a:1:{s:13:"administrator";s:1:"1";}
|
- On the right, select Go.
- Select the Insert tab again.
- In the Value column, enter the following:
|
Field |
What it is... |
|
user_id |
Enter the ID from step 5. |
|
meta_key |
Enter the word user_level preceded by the database prefix noted in Step 8 (for example, if your database prefix was wp_, enter wp_user_level, if it's wp_1wsryb9585_, enter wp_1wsryb9585_user_level and so on). |
|
meta_value |
Enter number 10. |
- On the right, select Go.
You can now sign in to WordPress with your new username and password.
Note: To be able to sign into WordPress with a new user, your sign-in page has to work properly. If there's an error on the sign-in page, you'll have to fix the error first.
More Info
- Here's what to do if you're unable to sign in to WordPress.
Unable to sign in to WordPress
If you can't access your WordPress dashboard, it's usually because the password you're using is not correct, or your WordPress user isn't set up correctly. To regain access to your dashboard, update your WordPress password and, if this doesn't help, create a new WordPress user and try signing in with the new username and password.
Note: This article describes ways to regain access to your WordPress dashboard when the sign in page loads correctly. If you see an error on the page, you should resolve the error first.
Try private browsing mode
Before you start troubleshooting, use private browsing mode in Chrome, Firefox, or Edge browsers to try to sign in. This will eliminate the possibility that the issue is caused by your browser.
Update your WordPress password
There are several ways to update your WordPress password. Typically, you can perform this from within your WordPress dashboard. However, when you can't access the dashboard, you can choose one of the options below.
|
Options |
Difficulty |
|
Reset my WordPress password |
Easy |
|
Change a WordPress password with SSH |
Medium |
|
Change your WordPress password with WP-CLI |
Hard |
|
Change my WordPress password in the database |
Hard |
Create a new WordPress admin user
If you still can't sign in to your dashboard after you have changed the password, it's possible that something is wrong with your user's setup. That's when creating a new WordPress admin user in the database can help.
More Info
- Check out the solutions provided in the official WordPress documentation.
- If you don't want to deal with fixing this issue yourself, our WordPress Premium Support team can do that for you
- If you need any assistance with creating or managing WordPress users, our WordPress Prmium Support team can help.
Use PHP scripts and applications
Build a feature-rich website with PHP
PHP upload limits on shared hosting
Your default PHP upload limit depends on the type of hosting account you have (What type of hosting account do I have?)
|
Type |
Default upload limit |
Max |
|
Web Hosting (cPanel) |
32MB |
128MB |
|
Windows Hosting (Plesk) |
2MB |
2GB |
|
Managed WordPress |
100MB |
192MB |
The upload limit does not guarantee an upload will complete — only that it isn't rejected by the server. Uploads beneath the upload limit can still fail because of:
- Upload speed, which can cause your PHP script or browser to time out.
- Your account's resource availability, which can cause large files to fail.
Change your PHP upload limit
To change the limitation, edit or add the following values in your PHP initialization file (What filename does my PHP initialization file need to use?)
The following settings change your PHP upload limit, allowing you to upload files up to 50MB in size. Setting the PHP upload limit higher than the Max listed above will force the setting to use the default upload limit instead.
file_uploads = On
post_max_size = 50M
upload_max_filesize = 50M
More info
- Change PHP upload limits for my Web Hosting (cPanel) account
- What filename does my PHP initialization file need to use?
- Increase the WordPress memory limit
- Edit files in Windows Hosting
Change PHP settings for my hosting account
If the default PHP settings for your hosting account don't meet the requirements of your website or application, follow these steps to change your PHP settings.
Note: All of our shared hosting platforms use a .user.ini file for PHP directives. Not all INI settings can be changed in a .user.ini. Changes are limited to settings with the modes PHP_INI_PERDIR and PHP_INI_USER from the list of php.inidirectives at PHP.net.
- Read our article about PHP initialization file
- Access the File Manager Web Hosting (cPanel) |Windows Hosting (Plesk) | Managed WordPress | VPS
- Look for the .user.ini file in the root directory. That's the file you need to edit in the next step.
If you can't find that file in the root directory, use a text editor (for example, in cPanel use (File Manager)to create the file and then save it in the root directory. Be sure you name the file .user.ini.
- Edit the file:
Example:
memory_limit = 128M
max_input_vars = 2000
upload_max_filesize = 64M
post_max_size = 64M
max_execution_time = 120
Note: For more specific info on these PHP settings, see the PHP documentation for core php.ini directives.
- Use a phpinfo file to confirm the changes are complete.
More info
- Take a look at Web Hosting
- For more information about our premium support for WordPress, please visit our WP Premium Support Catalog.
Setup PHP error logging
When troubleshooting PHP errors, you will want to review your PHP logs. If you don't have PHP logs to review, use the following process to set up logging:
Note: For WordPress and Managed WordPress error logging please see Enable WordPress debug mode to display errors
- You should always backup your site before making any changes to your site.
- Locate your PHP initialization file.
- Edit the file. (Web Hosting (cPanel) / Windows Hosting (Plesk) / VPS Hosting)
- Place the following line in your initialization file:
error_log = /path/to/your/webroot/php_error.log
- error_log is the PHP function that will tell the web server to output your logs to a new file.
/path/to/your/webroot/php_error.logis the path to your new log.- Make sure to replace
/path/to/your/webrootwith the actual path your hosting account uses. - What is my absolute path? (Web Hosting (cPanel)/ Windows Hosting (Plesk)
- Create the a file named php_error.log in the in the webroot of your hosting.
- Restart your PHP processes (Web Hosting (cPanel)/ Windows Hosting (Plesk) Next steps
- Review your php_error.log for error details. (Web Hosting (cPanel)/ Windows Hosting (Plesk) / VPS Hosting)
More info
- For more information about PHP error logs, visit PHP.net
Increase the WordPress memory limit
Note: View Wurk Managed WordPress hosting plans
While working on your site, you may run into an issue that asks you to increase the WordPress memory limit. The easiest way to accomplish this is by editing your wp-config.php file.
Warning: You should always back up your site before making changes to the wp-config.php file.
- Access your WordPress files
- Locate the file wp-config.php in the root directory or folder.
- Double-click the wp-config.php file to open it.
- Select Edit.
- Find the following line:
/* That's all, stop editing! Happy publishing. */
- Right above the line in step five, add this code:
define('WP_MEMORY_LIMIT', '256M');
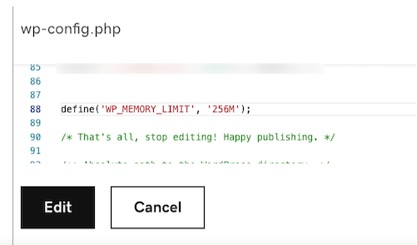
- Select Save.
You have successfully increased the WordPress memory limit.
More info
- An alternate method of increasing the WordPress memory limit is to edit your wp-config.php file via FTP.
Edit files in Windows Hosting
You can edit the contents of any text-based files on your Windows Hosting account.
Note: Before making changes, we recommend creating a copy of your files.
- Go to your Wurk product page.
- Below Web Hosting, next to the Windows Hosting account you want to use, select Manage.
- Select Plesk Admin.
- Select Files.
- In the list of files, select the file you want to edit and select Edit in Text Editor.
- Make your changes and select OK.
More info
- Create files in my Windows. Hosting account
- Create directories in y Windows Hosting account
What filename does my PHP initialization file need to use?
You can configure some of your PHP settings using a PHP initialization file. The file name your PHP initialization uses depends on the type of hosting account you have.
|
Hosting account type |
Filename |
Location |
|
Web Hosting (cPanel) |
.user.ini |
/public_html (one per account) |
|
Windows Hosting with Plesk |
.user.ini |
Website root (one per website) |
|
Managed WordPress |
.user.ini |
/html (one per website) |
Not all INI settings can be changed in a .user.ini. Changes are limited to settings with the modes PHP_INI_PERDIR and PHP_INI_USER from the list of php.ini directives at php.net.
Related steps
- To see changes you made to the .user.ini file, check the PHP settings with a phpinfo file
More info
- What is a .user.ini. file?
- See the PHP documentation for more info on PHP file
- Troubleshooting
Check here for help with common cPanel hosting issues
Common web page errors
HTTP status codes are three-digit numbers that provide Web browsers with information about the page's status. You might see some of these errors while browsing the Internet, or you might have received them in your own hosting account.
Here's a quick guide to help you understand the most common error codes with suggestions for what to do to fix the error:
400 — Bad Request
The Web server couldn't parse a malformed script. Most often, programming problems cause this issue. You should talk to your developer or software provider for help resolving this issue.
401 — Authentication Required
This page requires a user name and password to access it. If you try to access it without it, you get a 401 — Authentication Required message.
403 — Forbidden
Forbidden errors display when somebody tries to access a directory, file, or script without appropriate permissions. For example, if a script is readable only to the user and others cannot access the file, they'll see a 403 error.
Invalid index files and empty directories can also cause 403 errors. For more information, see one of the following articles based on the type of hosting account you have: Web Hosting (cPanel) / Windows Hosting with Plesk.
404 — Not Found
If visitors access URLs that don't exist, they receive 404 errors. The cause can be anything from invalid URLs, missing files, or redirects to URLs that no longer exist.
500 — Internal Server Error
This is a very general error that means there's a problem with the website displaying, but the details aren't readily available. Invalid .htaccess files, or invalid rules in them, commonly cause 500 errors with Web Hosting (cPanel) accounts. With Windows Hosting, it's most commonly invalid requests through a web.config file.
To find out what causes the issue:
- Linux — Review your Apache error logs.
- Windows — Enable detailed errors in your
web.configfile using the following code:
· <configuration>
· <system.webServer>
· <httpErrors errorMode="Detailed"/>
· </system.webServer></configuration>
For more information, check out the list of status code definitions at rfc-editor.org.
My website was hacked. What should I do?
A hacked website is really frustrating — it's troublesome for your business and visitors, and removing a hack can be time-consuming. Let's go through the fastest and easiest way to fix your website.
Let's check for warnings
If you've seen "This site contains malware" or "The site ahead contains harmful programs" in connection with your site, there's definitely a problem. To check further, visit a site like Sucuri SiteCheck scanner and enter your domain name.
- If your website's been hacked, you'll see a warning here.
- No warning? It's less likely (but still possible) that your website has been compromised.
Note: Sucuri SiteCheck is a free website security scanner. Remote scanners have limited access and results are not guaranteed.
Change your passwords
If your site's been hacked, you need to immediately change all your passwords.
Note: To make sure you use the right instructions, find out what type of type of hosting account you have.
|
Your hosting type |
Passwords to reset |
|
Web Hosting (cPanel) |
Primary FTP, secondary FTP, database, apps like WordPress or Joomla |
|
Windows Hosting (Plesk) |
Primary FTP, secondary FTP, database, apps like WordPress or Joomla |
Restore from backup
If you have a backup of your website (and database) that you know wasn't corrupted, you should re-upload it to your hosting account.
If you have Website Backup, you can easily do this for your cPanel or Plesk account.
If you don't have a backup tool, after resolving the issue we recommend adding Website Backup to your account.
Remove the hack
It's nearly impossible for anyone to reliably remove malware from a website by hand. To prevent your site from being compromised, we recommend using a Website Security plan that monitors and protects your website from malware and other potential security breaches.
Identify & fix the weakness
To prevent your site from getting hacked again, you should identify how your site was compromised. There are two types of weaknesses: passwords and structural problems.
Passwords
Most hacks happen because the attacker was able to guess your account's password by brute force. By simply changing your password (and using a stronger one this time), you can prevent these attacks from succeeding in the future.
Structural
These types of weaknesses require thorough testing to identify. There's a lot of security software that can perform these types of scans but, again, we recommend Sucuri SiteCheck scanner. Please note that remote scanners have limited access and results are not guaranteed.
Need help? Find help in our knowledgebase or simply chat to us .
Wurk and its subsidiaries are registered services provider.